Table of Contents
- What Is Soil Erosion and Why It Matters During Land Clearing
- Causes of Soil Erosion During Land Clearing
- Temporary Erosion Control Measures for Active Clearing
- Soil Stabilization Techniques to Protect Your Land
- Land Clearing Best Practices for Erosion Prevention
- Erosion Control Methods for Construction and Post-Clearing
- Regulatory Compliance and Permitting for Erosion Control
- Post-Clearing Maintenance Timeline and Soil Recovery
Preventing Soil Erosion During Land Clearing: A Practical Guide
Last Updated: July 24, 2026
Soil erosion during land clearing is one of the most overlooked risks in property development. When you remove vegetation and expose topsoil, you remove the glue that holds earth in place. Heavy rains, wind, and equipment movement can wash away months of accumulated soil nutrients in days. At Timber Shredders LLC, we’ve managed hundreds of clearing projects across Central Virginia and seen how preventing soil erosion makes the difference between a property that recovers quickly and one that becomes unusable.
Uncontrolled erosion creates sediment runoff that damages neighboring properties, violates stormwater regulations, and leaves your land degraded. The good news: erosion prevention doesn’t require expensive infrastructure. It requires understanding what causes erosion, implementing the right temporary barriers, and following a phased approach that protects soil health throughout clearing.
What Is Soil Erosion and Why It Matters During Land Clearing
Soil erosion is the process by which water, wind, or equipment movement displaces soil particles. During land clearing, this accelerates dramatically. Undisturbed forest or brushy property has vegetation that intercepts rainfall, root systems that bind soil, and leaf litter that absorbs water. Remove that vegetation, and you’ve removed three critical erosion barriers simultaneously.
According to USDA Natural Resources Conservation Service guidance on erosion control, unprotected cleared land can lose several inches of topsoil in a single heavy rain event. Topsoil contains the organic matter, microorganisms, and nutrients that make land usable for future landscaping, pasture, or construction.
Why does this matter? First, topsoil loss reduces property value and usability. Second, sediment runoff creates legal liability, if your erosion damages a neighbor’s property or contaminates a stream, you’re responsible. Third, most jurisdictions now require erosion control permits and best management practices (BMPs) during clearing. Failing to implement them results in fines, project delays, or mandatory restoration at your expense.
How Land Clearing Accelerates Erosion
Land clearing creates perfect conditions for erosion. Heavy equipment compacts soil, reducing its ability to absorb water and forcing rainfall to become runoff. Exposed soil has no vegetation to slow water movement or root systems to hold particles together. Slope matters too, properties with even a 5-10% grade experience severe erosion during clearing as water accelerates downslope, gaining erosive power.
Most clearing projects take weeks or months. During that window, your land is vulnerable to every rainfall. A single 2-inch rain event during active clearing can transport tons of sediment off your property. Temporary erosion control measures must be installed as clearing begins, not after it’s finished.
Causes of Soil Erosion During Land Clearing
Vegetation Removal and Topsoil Exposure
When you clear vegetation, trees, brush, grass, or root systems, you remove the primary barrier preventing soil particles from moving. Vegetation intercepts rainfall before it hits bare soil. Root systems physically bind soil particles together. Once that vegetation is gone, soil becomes loose and mobile.
Phased clearing, removing vegetation gradually rather than all at once, helps reduce erosion by allowing you to install protective measures between phases and maintain some vegetative cover while other areas are worked.
If your property has steep slopes or existing drainage patterns, prioritize clearing flatter areas first. This gives you time to install drainage controls before exposing the most erosion-prone areas.
Stormwater Runoff and Sediment Transport
Stormwater runoff is water that doesn’t infiltrate soil, it flows across the surface. During land clearing, exposed soil and compacted ground mean most rainfall becomes runoff instead of soaking in. This flowing water carries sediment off your property.
Research from EPA stormwater runoff best management practices shows that sediment-laden runoff from construction and clearing sites is the leading pollutant in waterways. This creates both environmental and legal consequences. Every ton of sediment that leaves your property is topsoil you’ll need to replace later. Preventing sediment loss during clearing directly protects your soil investment and reduces post-clearing restoration costs.
Temporary Erosion Control Measures for Active Clearing
While clearing is underway, temporary barriers and controls protect exposed soil from wind and water.
Installing Silt Fences and Sediment Barriers
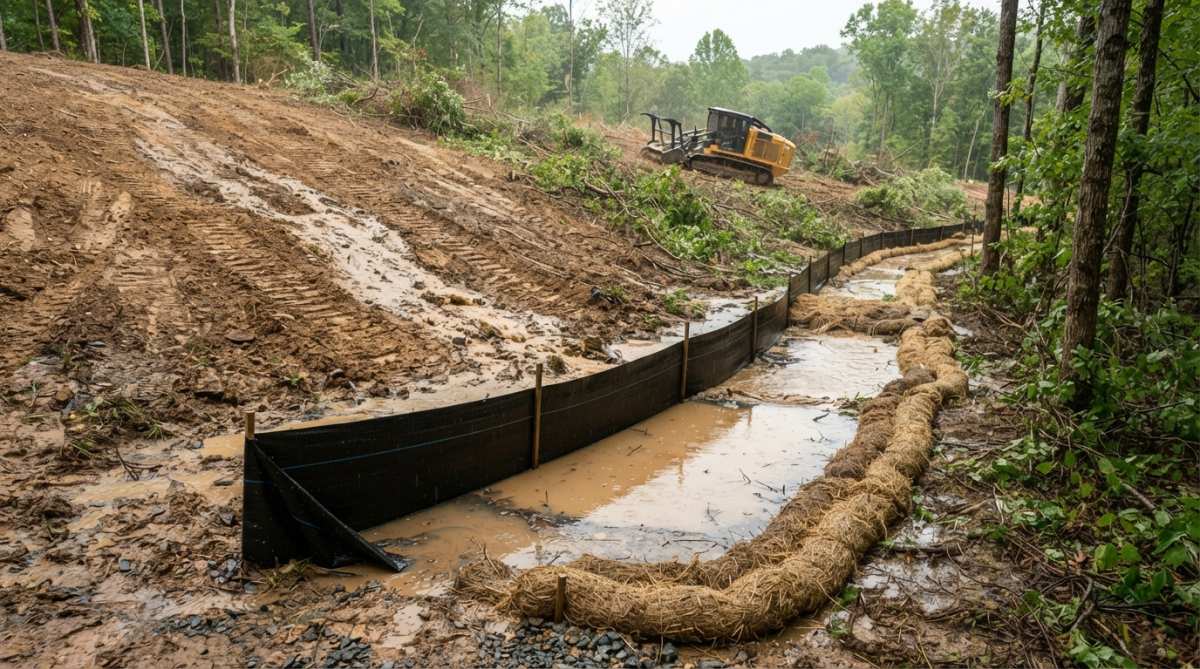
Silt fences are fabric barriers installed downslope of cleared areas to catch sediment-laden runoff. They work by slowing water velocity, allowing sediment particles to settle before water leaves your property. A typical silt fence consists of geotextile fabric (usually 3-4 feet tall) attached to wooden or metal posts driven into the ground.
Installation matters significantly. The fabric must be buried 6-8 inches into the ground to prevent water from flowing underneath. Posts should be spaced 4-6 feet apart to maintain tension and prevent sagging. The fence must run perpendicular to water flow direction, not parallel to slopes.
Silt fences are temporary, typically lasting 6-12 months before the fabric degrades. They’re most effective on gentle slopes (less than 1:3 grade). On steeper slopes, you need additional controls like sediment traps or slope drains. Regular maintenance, removing accumulated sediment every 2-4 weeks, is essential for effectiveness.
A clogged silt fence becomes useless. If sediment builds up faster than water can flow through the fence, water backs up and flows around it. Budget for regular maintenance throughout your clearing project.
Sediment barriers like straw wattles (logs of compacted straw wrapped in biodegradable netting) work well for smaller projects. Both require the same installation principle: positioned perpendicular to water flow, partially buried, and regularly maintained.
Using Erosion Control Blankets and Straw Wattles
Erosion control blankets (ECBs) are biodegradable mats laid directly over exposed soil to prevent water and wind erosion. They work by protecting soil from raindrop impact and reducing water velocity across the surface. Coir (coconut fiber) blankets are durable and work well on slopes. Straw blankets are less expensive but degrade quickly. Choose based on your timeline and slope steepness.
Installation requires proper anchoring. Blankets must be secured to soil with stakes or landscape pins every 2-3 feet to prevent wind from lifting them. On slopes, overlap blankets by 3-4 inches and stake the overlaps to prevent water from flowing underneath.
Straw wattles are bundles of straw wrapped in biodegradable netting, typically 4-6 inches in diameter and 10-15 feet long. They’re placed at the bottom of slopes or along contour lines to slow water movement and trap sediment. Check them after each rain to ensure they’re still anchored and functioning.
Sediment Traps and Drainage Management
Sediment traps are excavated areas (usually 3-6 feet deep) designed to collect runoff and allow sediment to settle. They work by reducing water velocity, as water slows in the trap, heavy sediment particles drop to the bottom while cleaner water flows out. Sediment traps are particularly useful on larger properties or where significant grading creates substantial runoff.
Proper sediment trap design is critical. The trap should be sized to handle runoff from your cleared area, generally about 1,200 cubic feet of storage per acre of cleared land. It should have gentle slopes to prevent collapse and allow sediment to settle evenly. An outlet structure (typically a pipe or weir) controls water level and prevents sediment from being flushed out during large storms.
Drainage management during clearing involves directing water flow to sediment controls rather than allowing it to flow freely across your property. This might mean installing temporary swales (shallow channels) that direct runoff to sediment traps, or installing slope drains (pipes that carry water from upslope areas to sediment controls).
Soil Stabilization Techniques to Protect Your Land
Beyond temporary barriers, soil stabilization techniques protect exposed soil and speed vegetation recovery.
Ground Cover and Vegetative Buffers
Establishing ground cover quickly is one of the most effective ways to prevent erosion. Live vegetation protects soil from raindrop impact, intercepts water, and provides root systems that bind soil together.
Vegetative buffers, strips of dense vegetation left standing during clearing, provide immediate erosion protection. Instead of clearing an entire property at once, leaving 20-30 foot vegetative buffers around property edges protects downslope areas from erosion. These buffers can be removed later after other erosion controls are established.
Temporary ground cover can be established quickly through hydroseeding or direct seeding. Annual rye grass, winter rye, and clover establish rapidly and provide erosion protection within 4-6 weeks.
Fast-growing temporary cover is more valuable than perfect permanent landscaping during active clearing. Get something growing quickly to stabilize soil, then refine plantings later.
Mulching and Biodegradable Materials
Mulch protects exposed soil from raindrop impact and wind erosion while improving soil moisture retention and organic matter content. Wood fiber mulch is the most common choice for clearing sites. Applied at 2-4 inches deep, it reduces erosion significantly while providing organic matter that improves soil health.
Biodegradable erosion control materials serve dual purposes. Straw, hay, and coir products protect soil while breaking down and adding organic matter. Application depth and coverage are critical. Mulch applied too thin (under 2 inches) doesn’t provide adequate protection. Applied too thick (over 4 inches), it can smother vegetation and prevent water infiltration. The goal is a consistent 2-3 inch layer that covers soil completely but doesn’t create barriers to water movement or plant growth.
Slope Protection and Terracing
On steeper slopes, simple mulching and ground cover aren’t sufficient. Terracing, creating level steps across a slope, is a traditional technique that’s highly effective for erosion control. Terraces reduce slope length, which reduces water velocity and erosion potential.
For temporary slope protection during clearing, slope drains and slope interruption devices work well. Slope drains are pipes or channels that carry water from upslope areas to sediment controls, preventing water from flowing directly down slopes. Slope interruption devices (like coir logs or erosion control blankets anchored at contour intervals) slow water movement across slopes and trap sediment.
Land Clearing Best Practices for Erosion Prevention
How clearing is executed, the sequence of operations, equipment selection, and site management, significantly impacts erosion outcomes.
Phased Clearing and Site Grading Strategy
Phased clearing removes vegetation in stages rather than all at once. This approach takes longer but provides superior erosion control and reduces sediment loss. Start with areas that are less erosion-prone (flatter areas, areas with better drainage). Protect these areas with temporary controls while you work. Move to more challenging areas (slopes, areas with poor drainage) only after you’ve established controls that can handle them.
Site grading strategy involves planning where equipment will travel and where soil will be moved. Minimizing equipment traffic reduces soil compaction and preserves soil structure in areas you’re not actively clearing. Soil stockpiles need protection too. If you’re removing topsoil and storing it for later use, cover stockpiles with erosion control blankets or mulch.
Equipment Selection and Soil Compaction Control
Different equipment creates different erosion impacts. Heavy tracked equipment (like dozers) compacts soil more severely than wheeled equipment. Forestry mulchers, which grind vegetation in place rather than moving it, create less soil disturbance than traditional clearing equipment.
Forestry mulching grinds trees and brush into mulch that’s left on-site, protecting soil while improving it. This approach prevents the soil disturbance that comes from moving material off-site and reduces the need for extensive erosion controls.
Soil compaction is a long-term problem. Compacted soil has reduced infiltration, which increases runoff and erosion potential for years after clearing. Clearing during dry periods reduces compaction. Equipment moves more easily through dry soil without sinking or creating ruts.
Erosion Control Methods for Construction and Post-Clearing
After active clearing is complete, erosion control shifts to stabilization and vegetation establishment.
Hydroseeding and Perennial Plant Establishment
Hydroseeding is the process of spraying a slurry of seed, mulch, and tackifier onto bare soil. It establishes vegetation quickly, much faster than traditional seeding, and provides temporary erosion control while vegetation grows. The hydroseeding mix typically includes perennial grasses suited to your region, tackifier (an adhesive that holds the slurry in place), and hydromulch (a fiber-based mulch that protects seed and soil).
Grass seed germinates in 7-14 days but doesn’t develop a strong root system for 4-6 weeks. During this period, the hydroseeded area needs protection from heavy rain and foot traffic. Temporary erosion controls (blankets, logs) protect newly seeded areas while vegetation establishes.
Don’t assume hydroseeding alone is sufficient erosion control. If you’re hydroseeding a slope, combine it with erosion control blankets or slope drains. The blanket protects seed while it germinates; the drain manages water that would otherwise cause erosion.
Cover Crops and Winter Rye for Soil Health
Cover crops are plants grown specifically to protect and improve soil. Winter rye, clover, and other cover crops establish quickly, protect soil from erosion, and add organic matter when incorporated. Winter rye establishes rapidly in fall, grows through winter, and provides excellent erosion control. In spring, it can be incorporated into soil (adding organic matter) or killed and left as mulch.
Cover crops prevent erosion, suppress weeds, break up compacted soil, and add nitrogen (legume crops like clover fix atmospheric nitrogen). Fall-planted cover crops (like winter rye) establish before winter and provide erosion protection through the wet winter months.
Regulatory Compliance and Permitting for Erosion Control
Most jurisdictions now require erosion control permits and best management practices (BMPs) during land clearing. Understanding and complying with these requirements prevents fines, project delays, and restoration costs.
Understanding Environmental Compliance Requirements
The Clean Water Act and state water quality laws require erosion control during construction and clearing activities. Most jurisdictions require some form of erosion and sediment control plan before clearing begins.
An erosion control plan identifies erosion risks on your property, specifies which controls will be installed, and shows where they’ll be located. It must address sediment barriers, slope protection, sediment traps, and temporary or permanent stabilization. Most jurisdictions require that you obtain a permit before clearing begins. Failure to obtain a permit or failure to install required controls can result in fines ranging from hundreds to thousands of dollars per day of violation.
Research from EPA construction stormwater permit requirements shows that most erosion violations result from inadequate planning rather than inadequate effort. Taking time to develop a proper erosion control plan and obtain necessary permits prevents most problems.
Best Management Practices (BMPs) and Water Quality Protection
Best management practices (BMPs) are proven techniques for preventing erosion and protecting water quality. They include sediment barriers, erosion control blankets, slope protection, vegetation establishment, and sediment traps.
Implementing BMPs protects more than just your property. Sediment from clearing sites clouds waterways, damages aquatic habitat, and reduces water quality downstream. The specific BMPs required vary by location and site conditions. A small residential clearing project might require only silt fences and temporary seeding. A larger commercial or construction project might require sediment traps, slope drains, permanent erosion controls, and regular monitoring. Your local soil and water conservation district or environmental agency can specify which BMPs apply to your project.
The cost of implementing BMPs during clearing is typically far less than the cost of addressing erosion problems afterward, restoring damaged land, paying fines, or addressing liability claims.
Post-Clearing Maintenance Timeline and Soil Recovery
Clearing doesn’t end when equipment leaves your property. Soil recovery and vegetation establishment continue for months or years afterward.
Immediate Actions After Clearing Completion
In the first weeks after clearing, focus on stabilizing exposed soil and establishing temporary or permanent cover. Install hydroseeding or temporary ground cover immediately. Mulch exposed soil areas. Inspect and maintain temporary erosion controls (silt fences, blankets, logs).
Remove temporary erosion controls only after vegetation has established and soil has stabilized. A good rule of thumb: keep temporary controls in place for at least 30 days after vegetation germinates, or longer if additional rain is expected. Begin establishing permanent vegetation, trees, shrubs, perennial plantings, if that’s part of your plan. Manage water drainage on your property to prevent erosion and waterlogging.
Long-Term Soil Health and Vegetation Establishment
Soil recovery from clearing typically takes 1-3 years, depending on how severely soil was compacted and disturbed. During this period, continue adding organic matter (mulch, compost, cover crops) to improve soil structure and biology.
Vegetation establishment accelerates soil recovery. As plants grow, their roots penetrate compacted soil, improving structure. Monitor your property for erosion. Even after vegetation is established, heavy rains can cause erosion, particularly on slopes. If you notice erosion gullies forming, address them immediately with additional mulch, erosion control blankets, or slope protection.
| Timeline | Action | Purpose |
|---|---|---|
| Week 1-2 | Install erosion controls (silt fences, blankets, logs) | Prevent sediment loss during active clearing |
| Week 2-4 | Establish temporary ground cover or hydroseeding | Stabilize exposed soil and begin vegetation recovery |
| Month 1-3 | Maintain erosion controls; monitor for erosion | Catch problems early; ensure controls are functioning |
| Month 3-6 | Establish permanent vegetation; remove temporary controls | Transition to long-term erosion protection |
| Month 6-12 | Add organic matter; monitor vegetation establishment | Support soil recovery and vegetation growth |
| Year 1-3 | Continue adding organic matter; monitor soil health | Complete soil recovery and establish stable vegetation |
Preventing soil erosion during land clearing requires planning, proper technique, and ongoing management. Timber Shredders LLC has completed hundreds of clearing projects across Central Virginia and refined our approach to minimize erosion while improving soil health. Our team uses professional equipment, understands site hydrology, and knows how to phase clearing to protect soil. If you’re planning a clearing project, let us help you do it right. Get a free quote from Timber Shredders LLC and discover how professional land management protects your property while improving its long-term usability.
Frequently Asked Questions
What’s the best way to prevent soil erosion during land clearing without damaging topsoil?
The most effective approach combines multiple methods: install silt fences and sediment barriers before clearing begins, use erosion control blankets on exposed slopes, establish vegetative buffers around the site, and implement proper drainage management. Professional forestry mulching equipment can clear vegetation while minimizing soil disturbance compared to traditional bulldozing. The key is planning your erosion control measures before clearing starts, not after.
How do temporary erosion control measures differ from permanent soil stabilization techniques?
Temporary erosion control measures, like silt fences, sediment traps, and erosion control blankets, protect soil during active clearing and are typically removed once the site stabilizes. Permanent soil stabilization techniques include ground cover establishment, cover crops like winter rye, mulching, and perennial plant installation that protect soil long-term. Both are essential: temporary measures manage runoff during clearing, while permanent techniques restore soil health and prevent future erosion after work is complete.
Do I need permits or environmental compliance approval for erosion control on my land clearing project?
Requirements depend on your location, property size, and clearing scope. Many jurisdictions require erosion control permits and compliance with Best Management Practices (BMPs) under stormwater regulations. The EPA and state environmental agencies enforce water quality protection standards. Contact your local soil and water conservation district or county planning office to determine what permits and erosion control plans your project requires before beginning any clearing work.
How long does it take for soil to recover after land clearing, and what should I do during that time?
Soil recovery typically takes 6-12 months depending on soil type, climate, and restoration methods used. Immediately after clearing, apply mulch or biodegradable materials to stabilize exposed soil and establish ground cover. Plant cover crops like winter rye in fall or establish perennial vegetation in spring. Avoid heavy traffic on recovering soil and monitor drainage to prevent new erosion. Patience with vegetation establishment is critical, rushing this phase can undo erosion prevention efforts.
This article was written using GrandRanker