
Table of Contents
- What Happens to Soil When Land Is Cleared
- Step 1: Assess and Manage Clearing Debris Properly
- Step 2: Conduct Soil Testing After Land Clearing
- Step 3: Use Soil Regeneration Techniques to Restore Structure
- Step 4: Apply Compost for Soil Improvement and Nutrient Recovery
- Step 5: Plant Cover Crops for Cleared Land
- Step 6: Add Mulch and Organic Amendments
- Step 7: Monitor Progress and Timeline Expectations
Last Updated: July 23, 2026
When land is cleared for construction, agriculture, or property reclamation, the soil left behind is rarely in ideal condition. Understanding how to improve soil health after clearing is essential if you want your land to be productive again, whether for pasture, gardens, or future development. The real issue isn’t just that cleared land looks barren, it’s what happens beneath the surface: compaction, nutrient depletion, pH shifts, and the loss of microbial communities that make soil alive. Improving soil health after clearing is a process that unfolds over months, not weeks, but it’s entirely achievable with the right sequence of steps.
Below, we’ll walk you through seven concrete steps to restore your soil, from debris management and testing through to monitoring long-term recovery.
What Happens to Soil When Land Is Cleared
Clearing removes vegetation, but the damage to soil structure runs deeper than most people expect.
Compaction and Structure Damage
Heavy equipment compacts soil dramatically. The weight of machinery crushes soil aggregates, the small clumps that give soil its structure and porosity. Once aggregates collapse, water either pools on the surface or runs off entirely, taking topsoil with it. Air pockets disappear, and roots can’t penetrate easily. Earthworms and other soil organisms abandon compacted zones because they can’t move through the dense matrix.
The structural damage also disrupts soil biology. Beneficial fungi and bacteria that form networks through soil pores are disrupted or killed. These microorganisms are critical for nutrient cycling and plant health; their loss is why cleared soil feels “dead.”
Nutrient Depletion and pH Shifts
Clearing removes the vegetation that was holding and cycling nutrients. When trees, shrubs, and grasses disappear, so does the organic matter they would have contributed to the soil. Nitrogen, essential for plant growth, is particularly vulnerable. pH can also shift unexpectedly after clearing, exposure to air and rain may cause acidification, or removal of acidifying vegetation may allow pH to rise. Without testing, you’re guessing, and guessing wrong can prevent plants from accessing nutrients even if those nutrients are present.
Step 1: Assess and Manage Clearing Debris Properly
The first step in improving soil health after clearing is dealing with what’s left behind. Clearing debris, stumps, logs, branches, rocks, needs to be managed strategically, not just piled in the corner.
If debris is left on the soil surface or buried shallowly, it can interfere with planting and nutrient cycling for years. Wood debris decomposes slowly and ties up nitrogen as it breaks down. The best approach is to remove large debris entirely or grind it into fine mulch. Forestry mulching grinds woody debris into small chips that can be spread back across the cleared area, where it protects soil from erosion, moderates temperature, and adds organic matter as it decomposes.
Timber Shredders LLC uses professional forestry mulching equipment that grinds woody debris on-site, eliminating removal costs and providing mulch that benefits soil recovery.
Step 2: Conduct Soil Testing After Land Clearing
Before you add anything to your soil or plant anything in it, you need to know what you’re working with. Soil testing reveals nutrient levels, pH, organic matter content, and soil texture, information that guides every decision you make next.
Most state cooperative extension offices offer affordable soil testing services. In Virginia, the Virginia Tech Soil Testing Laboratory provides comprehensive analysis. You’ll collect samples from several locations across your cleared property, mix them together, and submit them to the lab. The results tell you whether your soil is acidic or alkaline, whether nitrogen, phosphorus, and potassium are deficient, and what your soil texture is.
Understanding pH Correction After Clearing
pH is the measure of soil acidity or alkalinity, on a scale from 0 to 14, with 7 being neutral. Most plants prefer soil in the 6.0 to 7.0 range. Cleared soil often drifts away from this ideal range.
If your soil test shows pH below 6.0, your soil is too acidic. Raising pH requires adding lime (calcium carbonate or dolomitic limestone). Dolomitic limestone is preferable because it contains magnesium, which many soils lack. If pH is above 7.5, your soil is too alkaline. Lowering pH is slower and more difficult; sulfur can be added, but it works gradually. pH correction takes time, plan for 3 to 6 months for pH to stabilize after lime application. Retest after 6 months to confirm.
Step 3: Use Soil Regeneration Techniques to Restore Structure
Soil regeneration techniques rebuild the structure and biology that clearing destroyed. The most effective technique is adding organic matter, compost, aged manure, leaf litter, grass clippings. As organic matter breaks down, it feeds microorganisms and helps bind soil particles into aggregates, which create pore spaces for water drainage and air penetration.
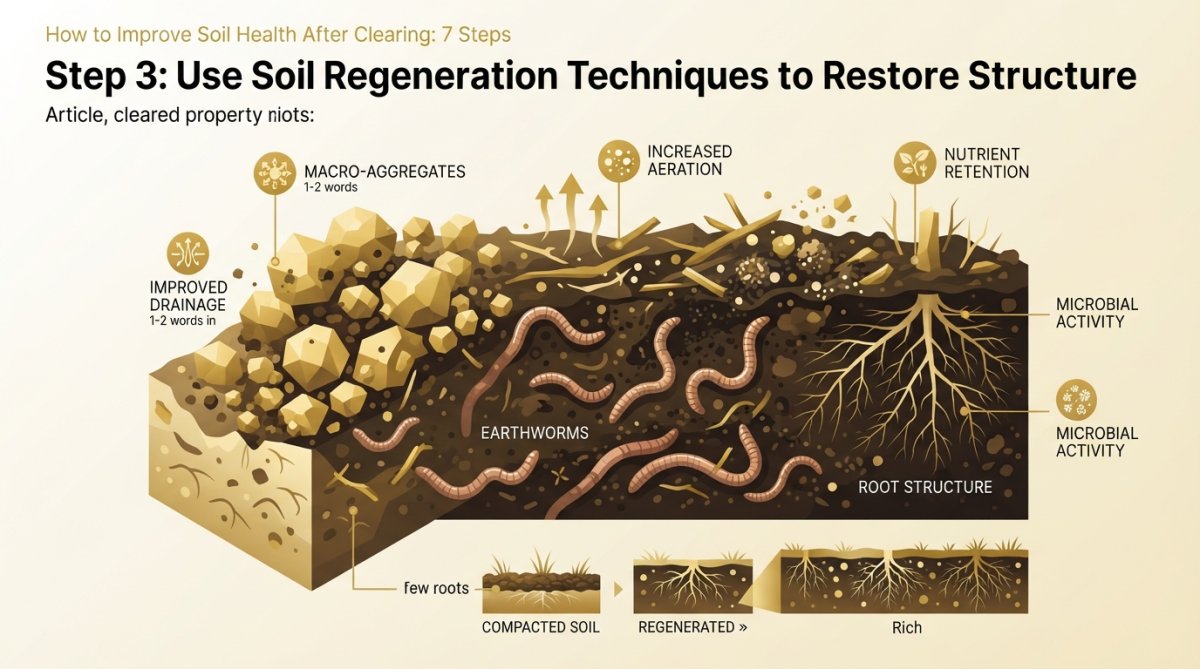
Apply 2 to 4 inches of compost or aged manure across your cleared area and work it into the top 6 to 8 inches of soil. Within weeks, you’ll notice the soil feels different, darker, crumbly, alive.
No-Till vs. Tilling: Which Approach Works Best
The no-till approach avoids tilling entirely. Instead of turning soil, you add organic amendments to the surface and let soil organisms work them in naturally. No-till preserves soil structure, protects microorganisms, and reduces erosion risk. It’s slower, but the long-term benefits are superior.
Tilling is faster for initial soil preparation, especially on heavily compacted soil. It breaks up compacted layers and incorporates amendments quickly. The downside is that tilling disrupts soil structure and kills soil organisms. For cleared land, a hybrid approach often works best: till once to incorporate organic matter and break up severe compaction, then switch to no-till methods for ongoing maintenance.
Step 4: Apply Compost for Soil Improvement and Nutrient Recovery
Compost is decomposed organic matter containing a diverse community of microorganisms that recolonize your soil and begin cycling nutrients. As compost decomposes further in your soil, it releases nitrogen, phosphorus, and potassium in forms plants can use.
Apply compost at a rate of 2 to 3 inches across your cleared area. Work it into the top 6 to 8 inches of soil, either by tilling or by layering it and allowing soil organisms to incorporate it over time. Avoid compost made from diseased plant material or contaminated feedstock.
Building Organic Matter and Microbial Life
Organic matter is the fuel that powers soil biology. Building organic matter is a long-term process. A single compost application boosts organic matter temporarily, but it continues to decompose and decline. To maintain and increase organic matter, you need to add it continuously, this is where cover crops become essential.
Microbial life includes bacteria, fungi, protozoa, and nematodes. When soil is compacted and depleted, microbial populations crash. Reestablishing them requires organic matter and time. You can accelerate microbial recovery by adding compost tea, a liquid extract of compost containing billions of microorganisms per milliliter, or microbial inoculants, concentrated preparations of beneficial microorganisms available from agricultural supply companies.
Step 5: Plant Cover Crops for Cleared Land
Cover crops are plants grown specifically to improve soil. They add organic matter, fix nitrogen, suppress weeds, and prevent erosion. For cleared land, cover crops are one of the most cost-effective ways to improve soil health.
Nitrogen-Fixing Legumes and Brassicas
Legumes, plants in the pea family, form relationships with bacteria that fix atmospheric nitrogen. Common legumes for cover crops include clover, vetch, and alfalfa. A legume cover crop can add 100 to 200 pounds of nitrogen per acre, reducing or eliminating the need for synthetic nitrogen fertilizer.
Brassicas, plants in the cabbage family, include radish, turnip, and rape. They don’t fix nitrogen, but they have deep roots that break up compacted soil and bring nutrients from deeper layers to the surface. A cover crop mix of legumes and brassicas works well for cleared land. Plant in fall (September through November in Virginia) or spring (March through April). Allow the cover crop to grow for at least 3 to 4 months before incorporating it. Incorporate by tilling or by cutting it down and allowing it to decompose on the surface.
Step 6: Add Mulch and Organic Amendments
Mulch protects soil and adds organic matter as it decomposes. A 2 to 3 inch layer moderates soil temperature, reduces water evaporation, suppresses weeds, and prevents erosion. Wood chips from forestry mulching are excellent, they’re free or low-cost if you use your own clearing debris, and they decompose over 1 to 2 years while feeding soil microorganisms.
Based on your soil test results, consider other organic amendments. Blood meal adds nitrogen quickly. Bone meal adds phosphorus. Kelp meal adds potassium and trace minerals. Rock dust adds micronutrients. These amendments feed soil biology and build long-term fertility.
Step 7: Monitor Progress and Timeline Expectations
Improving soil health after clearing is not a quick fix. Realistic timeline expectations prevent frustration and help you stay committed.
Immediate changes (weeks 1-4) are visible but superficial. Soil darkens as you add compost or mulch. Short-term improvements (months 2-6) become noticeable. Soil feels crumbly instead of hard. Earthworms appear. Water drains better. Medium-term recovery (6-12 months) shows substantial progress. Soil structure continues to improve. Organic matter increases measurably. Long-term restoration (1-3 years) brings the soil to a state where it supports productive plants consistently.
The timeline depends on how severely the soil was damaged, how much effort you invest, and your climate. In Central Virginia, with moderate effort and regular organic matter addition, you can expect functional soil recovery in 12 to 18 months and near-full restoration in 2 to 3 years.
Monitor progress by conducting a second soil test after 12 months. Compare nutrient levels, pH, and organic matter to your initial test. Observe plant growth and soil appearance regularly. Healthy soil should be dark, crumbly, and teeming with visible life.
| Improvement Stage | Timeline | Visible Signs | Key Actions |
|---|---|---|---|
| Immediate | Weeks 1-4 | Darker soil, improved drainage | Add compost, mulch; till if needed |
| Short-term | Months 2-6 | Crumbly texture, earthworms visible | Plant cover crops, add amendments |
| Medium-term | Months 6-12 | Strong plant growth, stable structure | Incorporate cover crops, monitor pH |
| Long-term | 1-3 years | Productive plants, high organic matter | Maintain with annual amendments |
Improving soil health after clearing is achievable, but it requires patience and consistent effort. If you’re facing a large cleared property and want professional assistance with debris management and initial soil preparation, Timber Shredders LLC specializes in forestry mulching and land clearing that preserves soil health. Their equipment grinds clearing debris into beneficial mulch on-site, eliminating debris removal costs and providing the organic matter your soil needs to recover. Get a free quote from Timber Shredders LLC and see how professional land management can accelerate your soil restoration timeline.
Frequently Asked Questions
How do you restore nutrients to soil after clearing?
Restore nutrients through multiple methods: apply compost and aged manure to rebuild organic matter, conduct soil testing to identify specific deficiencies, plant nitrogen-fixing cover crops like legumes and clover, and use targeted soil amendments such as blood meal for nitrogen. Microbial inoculation can accelerate nutrient cycling. Timeline for full nutrient recovery typically ranges from 6 months to 2 years depending on initial soil condition and amendment intensity.
What are the best cover crops for cleared land?
Legumes (clover, alfalfa, vetch) and brassicas (rye, mustard) are top choices for cleared land. Legumes fix atmospheric nitrogen naturally, enriching depleted soil. Cool-season crops like winter rye establish quickly on bare ground and prevent erosion. Warm-season options like buckwheat work well for summer planting. Select based on your region’s climate, planting season, and whether you need nitrogen fixation or erosion control. Most cover crops should be tilled or mulched back into soil after 3-6 months to maximize nutrient return.
How long does it take to improve soil health after clearing?
Initial improvements appear within 3-6 months of adding compost and amendments, but complete soil health restoration typically requires 12-24 months. Soil structure rebuilding, microbial community establishment, and nutrient cycling maturation take time. Factors affecting timeline include initial soil damage severity, amendment application rate, cover crop integration, and local climate. Consistent management with organic matter additions and cover crops accelerates recovery throughout this window.
Do I need soil testing after land clearing, or can I just add compost?
Soil testing is highly recommended after clearing because it reveals pH shifts, nutrient deficiencies, and compaction levels that compost alone won’t address. Testing identifies whether you need pH correction (lime or sulfur), specific nutrient amendments (nitrogen, phosphorus, potassium), or microbial inoculation. Without testing, you may over-apply amendments or miss critical imbalances. A basic soil test costs far less than wasted amendments and guides your entire soil regeneration strategy for maximum effectiveness.
This article was written using GrandRanker